Thumb LED Piano Post #3

Circuit SchemeDay #3 Completing the LED circuits

I love making my own LED lighting displays for Diwali and Christmas. As a DIY enthusiast, I often got lost on the number of LEDs I could hook up to a single DC power source in my LED string and create nicely lit LED lights.

The number of LED that can be driven by a battery or DC power source depends upon the following factors:

  • Voltage Drop across LED in Forward Bias Mode
  • Maximum current that can be passed through the LED
  • Voltage & Current Rating of DC source

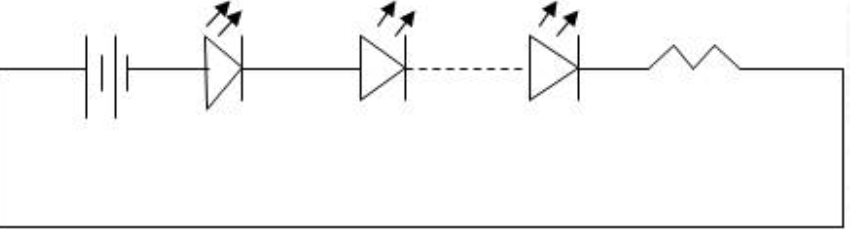
From my own electronics experience, I decided that it was best to use a series of current limit resistors. With this, I am able to make simple and small circuits. These circuits will be placed INSIDE of the instrument so I don’t want to increase the weight of the product which could impact the user’s experience. I want the piano to be as lightweight and “mobile” as possible. I created 6 different circuits which took about 45 minutes to make. I attached a schematic of my circuit design!

I can now glue and put everything together 🙂


Thumb LED Piano Post #2

Day #2 Making the Instrument

The thumb piano or “Kalimba”, is an African instrument that’s played with your thumbs. It is a very old instrument that has been played for thousands of years. In African countries, it has different names. The sounding body part is the flexible metal strips in different length, while use wood or gourd as a resonance box. The function of playing thumb piano is not only get rid of the evil from patients, but also play the role of praying for rain. Therefore, it is one of people’s favorite instruments in many countries.

One of the first things I did was create a template for the shape of the piano from card and wood. I used this to help myself shape the edges and sides of the piano using the mahogany wood. I will glue all of the pieces together with the appropriate adhesive. This will be done at the very end because I need to build the appropriate LED circuit to place inside of the instrument. This is going to help power the LEDs.

A centered hole essentially lets the sound escape from the “sound box” of the piano. My next challenge was trying to figure out how to carve a hole onto my front template. My father used his spade bit to cut and small sized hole into the wood. The slice is centered on the bottom of the piano. Next, I purchased different lengths of steel slices to produce the sound. The notes are tuned by pressing on the steel with the thumbs. When the thumb presses and releases the piano, the steel slice will make sounds and, in my case, the LED lights will trigger. With the opening from the hole, the music can be heard. I screwed these pieces to the top half of the board. Now I have a simple thumb piano! I just need to complete the circuits to power the LED lights tomorrow.


Thumb LED Piano

It always feels better to make something than to buy it, which is why we love to DIY when it comes to crafts. This is a huge reason why I am choosing to create an instrument for my MUS 4744 project. Not only do I learn a lot during the process, there’s a sense of satisfaction an increase in value in the things that can make. Still, crafting, whether it’s building a piece of furniture or making a necklace can be a little intimidating.


Day #1 Gathering the materials

In my case, I am making a thumb LED piano. Basically, a thumb piano with LED lights attached to it. I plan on constructing a simple led bulb circuit for each light. For this, I was going to need wires, a battery (for voltage), resistors and LED lights. And I fund these supplies today at both The Home Depot and Walmart stores. I was able to find mahogany wood, some steel pieces (for sound)  and screws/glue for construction. My dad has a wood cutter, so I am going to get him to slice a few measurements for me. To my surprise, these materials were not hard to find considering the pandemic going on. After all, everyone is trying to stock up on hand sanitizer and soap. Tomorrow, I’ll be back to assemble my instrument with the steel attachments.